It’s essential for any seller to be able to go about their business with their chosen eCommerce solution smoothly. A platform that makes things difficult isn’t a platform worth using: it’s your product on the line. Business owners are always trying to find the easiest and most efficient way to run the shop. With this in mind, we at Bright Vessel always recommend WooCommerce first and foremost. Why? Because the way to manage WooCommerce is painless and straightforward, as you’ll see on this tutorial.
Too many eCommerce platforms had developers in mind during their creation instead of actual business owners. In these cases, the process of managing an eStore can be cumbersome and inorganic. On WooCommerce, however, this is simple enough.
To learn how to manage WooCommerce, first get to the Products tab on the plugin!

Manage WooCommerce: Adding Products
The Products page lists all the items present in your eStore. If you’re just starting, it’ll be empty. Here’s how to change that and start to manage WooCommerce:
- On the menu at the left, click on Add Product. The new screen should look familiar, as the layout is the same as the regular WordPress editor.
- Add product title, description, images, and media. At the top of the screen, you’ll be able to customize the first things about the new product.
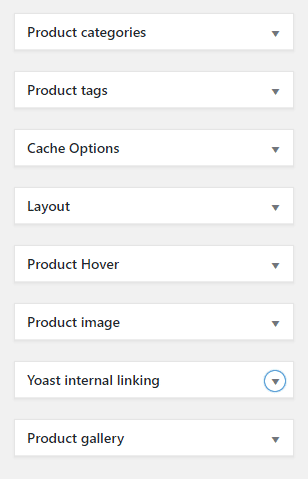
This section allows you to customize many other things, such as:

- Product Categories. Here, you can create categories and subcategories for the items and services you’re offering. This way, both you and your customers will find it easier to browse around the eStore.
- Product Tags. The option allows you to create specific tags for your products, further categorizing and distinguishing them from others.
- Product Image. You can upload photos here, and they’ll show up on the Product and Shop pages. Think of this feature as the equivalent to a regular post’s featured image.
- Product Gallery. If you’re selling physical items, here you can create a specific gallery showcasing them. This menu is particularly helpful if you’re selling different sizes or colors of the same thing, as a gallery can help you show the variables.

Manage WooCommerce: Additional Product Data
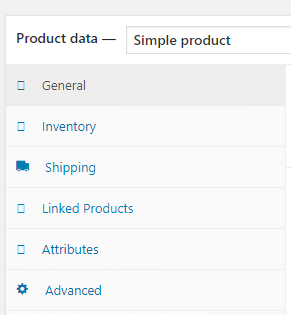
Now that you’ve added products, it’s time to scroll down to see more complex options to manage WooCommerce. Product Data will appear to you as a drop-down menu where you can choose what kind of product you’ll be selling. The possibilities are:
- Simple Products. These are traditional, physical items, such as a t-shirt or a notebook. The majority of products on eCommerce stores fit into this category.
- Grouped Products. These are collections of items that are related to each other in some way or another and thus sold in groups. In this case, there’s one main product that comes with a set of variations of the central product. For example, if your main product is a specific software, the single versions would be the platforms where it can be used, like Windows or Mac.
- External/Affiliate Products. These are products that customers can purchase on your store, although they’re originally from some other eStore. Not unlike promoting or advertising products, you end up getting a commission or fixed percentage for each sale made through your site. External and Affiliate products always have a link to another website.
- Variable Products. These are products with different variations to them, like colors and sizes. In this scenario, the different colors and sizes will have different prices, stock keeping unit (SKU, a specific number to track inventory), etc.

Product Data Options
Each type of product you sell will give you a set of options for you to configure.
Associated with each Product data type, there are specific sets of options which need configuring. The following are the broad subcategories, which will depend on what you’ll offer:
- Virtual or Physical. While the majority of products are physical ones, you’ll need to check this if you’re selling virtual content. Virtual products can include anything from embroidery patterns to apps. Choosing to sell virtual products will remove shipping options.
- Downloadable. Here, you can specify whether customers can download your product and even add the actual file. You can also add extra relevant content, such as Terms and Conditions or a Read Me file.
- General. Here, you’ll be able to give each of your products an SKU, add regular prices and those during discounts, and toggle date ranges for exclusive promos, among other things. It’ll also be your first foray into taxes, as you can specify under what regime your products fall.
- Inventory. Specifically made for physical products, this is where you can see if something is in stock. Plus, you can see how many items you have left and determine whether you’ll accept back orders.
- Shipping. This menu allows you to set shipping categories as well as setting the weight and dimensions.
- Linked Products. On this menu, you can choose which products the site will recommend to those purchasing a specific item.
- Advanced. This menu allows you to customize further by doing things like changing the order of the products in the list, add custom purchase notes or allow reviews.
In Conclusion
It’s easy to manage WooCommerce, and Bright Vessel is here to help you on every step of the way. Do you need full hosting management for your site? Check out our Manage service.


