

It is possible to find many different free or paid SEO plugins on the market. However, Yoast SEO is one of the most trustworthy sources, and it is a 100% free.
Once that you have downloaded and installed Yoast SEO which is quite simple, you will have to set the plugin up.
To begin, you should go to your site’s administrator dashboard and find the “SEO” option on the menu. Then, you should click on “General” which will lead you to the basic global SEO possibilities you can use.
Your Information: include your site´s name or an alternative name. You might also add if it is a company's name or a person.
If you are using a company's website, you would have the possibility of adding the company's logo.

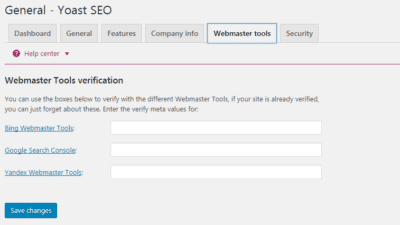
Webmaster Tools: the process is quite simple, and it is similar to all tools you want to use. You will need to follow these easy steps:
Security: This section would be handy if multiple authors are working on the same page. If this box is left unchecked, it will allow an advanced segment to be visible in the Yoast toolbox that is shown on the page´s page editor. You only need to check the box to make sure it is fine, and you should not worry about it.
Titles & Metas: it can be found in the “SEO” option, and it is where you can decide how your site appears in SERPs. When you are in this section, you will see the “general” tab
General Tab: you can change the title display which will appear on all pages of the site.
Homepage: it will vary according to the webpage you are working on. You can edit your page from this section by clicking on the “editing the front page/blog.
Titles and meta descriptions: you will find basic templates for your titles and meta descriptions for your main page. You can use the variables, and the information you specified will be included automatically.
Date in Snippet Preview: this would be useful if you are making multiple postings, but if you do not make them so often, you would probably want to have it disabled.
Yoast SEO Meta Box: this is useful when dealing with multiple contributors because it prevents them from changing anything.
Archives: you have the choice of indexing your archive pages or disable them all together.
Social: This is a certain section. You need to add the URLs to the social media profiles (except Twitter that you only need the username). You can control the shared content on each social media like Facebook, Pinterest, Google +, among others.
XML Sitemaps: Yoast SEO automatically generates a sitemap, updates it as you add new content, and pings search engines when it’s updated.
Breadcrumbs: it helps the visitors to see links at the top of the page.
Permalinks: you can clean your URL structure up. Yoast explains it very clearly.
RSS: add content to posts when appearing in the feeds.
Search Console (Google Search Console) get verifications code to be able to connect Yoast to Google Search Console. In this way, you can avoid site errors and fix your dashboard.
Simple steps to do it:
Tools: make a list of posts and pages to make it simpler to go through and make all changes at once.
Using Yoast SEO: choose “All Post” or All Pages” to have the list displayed of your posts and pages. There should be an “SEO” column on the right. It will show a dot that indicates how Yoast SEO rated your page.
General: introduce focus keyword, and the plugin would look at the page content, title, URL, meta description, heading and it will let you know the targeted keyword.
Page Analysis: feedback based on your activity, if you need to include or modify any aspect of the page.
Meta Robot Advanced: change settings for meta robots and sitemaps or set a 301 redirect URL.
Social: this section would shape your idea for social media. Try to make it appealing for people to look at and to stand out from the rest of the pages.
Publish is the last step of the process. You can schedule a post, change your privacy by releasing the post. Then you will get a Yoast SEO rate that post or page as a whole.
Yoast is your secret weapon when it comes to writing a mind-blowing meta description. The best meta descriptions will let search engines and the reader understand what your web page or posts are about. Typically, a meta description will have a maximum of 320 characters summarizing your page’s content. These meta descriptions show up when they contain a particular phrase or keyword that the user is searching for.
Yoast goes above and beyond when it comes to creating content for SEO. With the Yoast plugin, you are:
As you develop your meta information, Yoast will show you the snippet preview, allowing you to see how your description will appear in a Google search. What’s more, Yoast can help you get verified authorship with Google for your website.
Without a proper meta description, your content is likely to become just another set of words floating through the Internet. At Bright Vessel, we understand how important it is to develop a strong content plan and we believe that Yoast SEO is a great tool to achieve it. So don’t hesitate to learn how we can help you improve your meta descriptions with Yoast SEO.
Contact us for more information and assessment.

"*" indicates required fields

"*" indicates required fields

"*" indicates required fields
You must be logged in to post a comment.


