A question we often get asked is "How do I Submit My Sitemap to Google?"
In early 2018, Google introduced a new and improved version of its tool for webmasters. It made the process to index website Google a whole lot easier, through new tools for submitting sitemaps and URLs. The tool is perfect for those building a site from scratch and webmasters who are always on top of everything. But there are more than a few misconceptions about sitemaps.

What’s a Sitemap?
Like its name would suggest, it’s a sort of map of your website. You can send it to Google to provide details about your
What a sitemap does:
- It gives details about your pages, including videos and any other files in them.
- Helps Googlebot crawl around your site, already knowing the relationship between the pages.
- To index website Google, you can mark which pages are more important regarding SEO.
Must I Submit a Sitemap to Index Website Google?
You don’t have to, but it will make things easier. Google will be able to find your site either way, but it’ll be easier for Googlebot to crawl your pages with a sitemap. When you submit a sitemap, you’ve given Google directions around your site.
Take into consideration that Googlebot has hundreds of trillions of pages to crawl all the time. You want to be near the top of the list.
What Should I Use to Submit My Sitemap to Google?
As mentioned above, Google provides its free tool for webmasters to do this: Search Console. On this post, we’ll focus on its use as the means to submit a sitemap, but it serves many other purposes.
Some of the main ones are:
- Checking your index website Google status later on.
- Optimizing your visibility on the search engine.
What’s the Proper Format for a Sitemap?
The index can be either XML (Extensible Markup Language) or HTML (Hypertext Markup Language). Googlebot can read both of these, but one is preferred:
- HTML makes for messy code because it was created for human eyes instead of for computers.
- XML is easier to read for search engines. That’s why it’s the best way to go concerning search engine optimization, and particularly to index website Google.

How Do I Build a Sitemap?
How you build sitemaps will depend on where you’ve built your website:
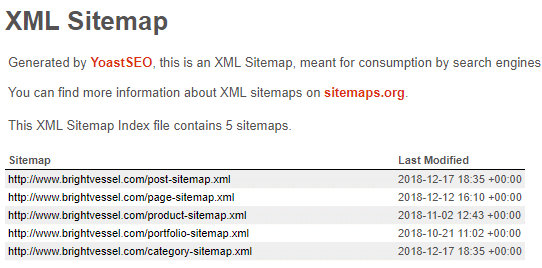
- WordPress. If you made your site using WordPress CMS, you could use a plugin to create your sitemap. One of our favorites is Yoast, which is free and SEO friendly. Through it, you can create your sitemap and index all your pages and their content.
- Other CMS platforms. Yoast is also available for the TYPO3 and Magento 2. For other big platforms, you can look up whether they have an equivalent plugin that can help you create a sitemap.
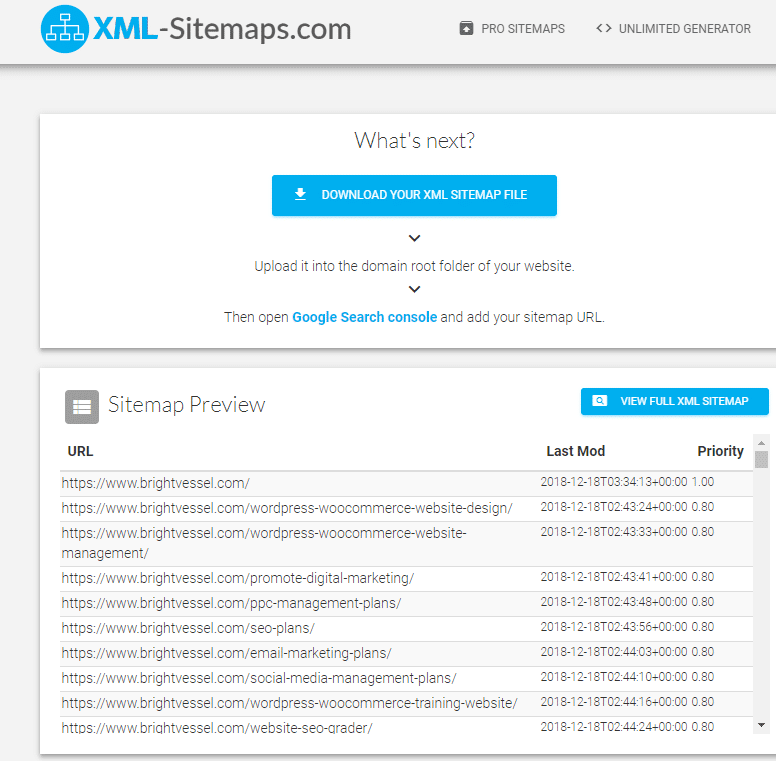
- Independent servers. If you used a standalone server to build your site, you'd need to create your sitemap manually. You or a hired programmer can do this by creating the XML file on a Microsoft Excel or Google Spreadsheets file. You can also use a sitemap generator like Screaming Frog, XML-Sitemaps.com or XML Sitemap Generator.
We highly encourage you to submit an XML file, even if you’re building your sitemap from scratch. Since the code design is cleaner, it’ll make the index website Google process easier. If, however, you’ve chosen HTML, create a webpage with links to each of the pages you want the search engine to index. Only then should you submit the page URL to Search Console.
Should I Index Every Page on My Website?
Not necessarily! There are a few instances where you might prefer to keep Google away. These include:
- You’ve barely gone live with your website, and it still needs tweaking. At this point, you might not be ready for Google to index you.
- You want to keep some pages off-limits to the index website Google. Check out pages and action completion pages can be an excellent example of this. Generally speaking, you don’t need archived or duplicated pages to index on Google.
You can tell Google not to index a page by using robots exclusions protocol standard, also known as robots.txt files. You can get specific with these, telling Google which pages are the most essential and should take priority, and which ones you don’t need indexing at all.
How Google Search Console Works Now
In January 2018, Google’s platform for webmasters went through a significant overhaul, and every indexed webmaster gained access to the new features.
Some of the features improved over the past few months are:
- The Index Coverage report now provides a far more accurate view of the site’s content.
- The Links report allows you to learn more about the links on your site and the ones that point to you.
- The Performance report now shows 16 months worth of search Analytics data.
- The URL Inspection tool. It crawls and indexes specific versions of whatever page you need, plus it now works with mobile versions of websites. The tool also includes indexing and informs webmasters about correct data errors. Even more importantly, it allows webmasters to submit individual URLs.
- Search Console now alerts webmasters regarding accelerated Mobile Pages Project (AMP), crawling, mobile usability, job postings, indexing, and recipes.
- It pinpoints the exact point where there might be an error in the HTML code.
- Google now notifies you regarding fixed queries and issues.
- Organization personnel now fixes problems faster by using problem sharing.
- The process of submitting sitemaps has become far more manageable.
- User management has dramatically improved, and it’s now possible to add a new site to your account.
This Is All great, But How Do I Submit My Sitemap to Google?
First, go to your Google Search Console account and click on “Start Now.” You’ll reach the platform’s new dashboard. From here, you’ll be able to see your current properties; however, if you don’t have any, Google will guide you through the process.
Then, click on “Search Property.” A drop-down menu will appear, where you’ll click on “Add property.” Here, you’ll add the URL of your domain, in four different formats, as Google sees them all as separate websites.
You’ll be indexing the following formats:
- http://
- https://
- http://www
- https://www
Google will then try to verify you own the site. You can prove ownership in different ways:
- Download the Google HTML file, then uploading the code to your domain. This is the recommended course of action, and it won’t have any negative repercussions on your domain’s code.
- Copy and paste the meta tag provided by Google on your homepage.
- Use Google Analytics to add Google’s tracking code to the <head> section of your homepage.
- On Google Tag Manager, turn on the “manage” permission and apply the container snippet.
- Change your DNS through your Domain name provider.
After you’ve verified ownership, you’ll automatically return to your Google Console dashboard. You’ll now be able to request reports like Performance, Coverage, and Enhancement. These include details ranging from clicks to errors, in an easy-on-the-eyes view.
From here, you can continue the index website Google process:
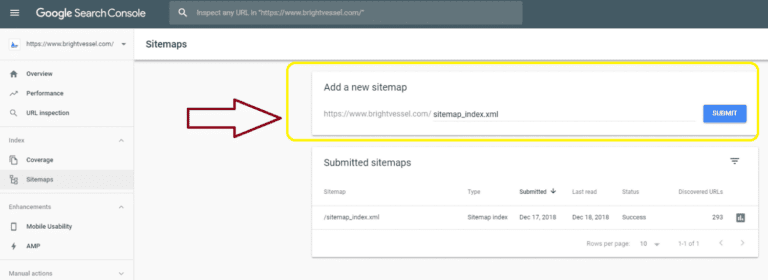
- Click on “Sitemaps” at the menu panel.
- Copy and paste the URL slug from the XML file discussed above. Keep in mind which version of your sitemap you’re sending Google, as the HTTP sitemap will need to match with your HTTP domain property.
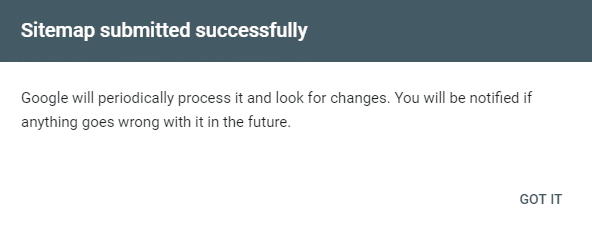
- Select “Submit.” Googlebot will proceed to crawl the pages you’ve requested. If there aren’t any errors at this point, Google will index each of these pages into its search results. If there are errors, Google will send you a report, specifying what needs to fixing to move forward. You’ll need to check each little error and fix it manually. Once you've solved all issues, your sitemap status will change to “Success.”
Your New Sitemap Dashboard
You can now see a lot of information about your files, such as:
- The type of data you added.
- When you submitted your sitemap file.
- The sitemap status.
- Which files you've submitted, and which ones Googlebot has crawled and indexed.
- How many links Googlebot found.
- See the updates on the sitemap files you’ve uploaded.
Based on these options, there are plenty of filters you can add to view the different indexes.
It’s important to note that there’s the limit to the number of sitemap files you can have on your website. It’s a good practice to return to Google Search Console every time you add something on your site and update behind the scenes. That way, you’re helping Google rank your pages as your site continues to grow.
As your website grows, sitemaps become increasingly essential to position yourself on Google. Keep updating!

How to Submit a URL
One of the most significant 2018 updates to Google Search Console is the addition of the Inspection tool. It allows webmasters to add individual links to website maps, instead of doing it by bulk. This can be a great option in several scenarios, mainly if you’re continuing to grow your site as you go.
Here’s how to submit an individual URL:
- Go to the menu panel and click on “URL inspection.” Alternatively, you can also select the URL inspection search bar.
- Paste the URL from the version you’re viewing on GSC into the Inspection search bar, making Googlebot quickly crawl the URL and make a report. This report will include the live link on Google, submission, indexing, whether it’s usable for mobile.
- Much like it happens when you submit a sitemap, Google Search Console might deem this a “Success.” If this is the case, you’ll see multiple green checkmarks. Otherwise, Google Search Console will give you a list of the issues and the way to fix them.
- Double-check by selecting “Test Live URL.” This live test will mean Google runs the URL down one more time, in case any other issues pop up. If you have errors, make sure you fix them before officially going live. Afterward, select “Request Indexing” for Googlebot to crawl your page again.

Congratulations - You Did It!
You’ve officially gone through an index website Google procedure. With your integrated dashboards, you can now review all the pertinent reports and site analytics. Whenever you need to add any extra URLs, you can redo the same process as above.
So what next? There is no shortage of SEO tasks needed on a website. Check out these post to help you improve your pages:
6 Common SEO Mistakes Keeping Your Website from Ranking No. 1
The Beginner’s Guide to WordPress SEO
The Ultimate SEO Checklist
Keep reading the Bright Vessel blog for more information on the Google Search Console updates. Learn more about our WordPress and SEO services on our website, or just contact us for more details!


